Building Scalable Infrastructure with AWS S3, Lambda, and ECS/Docker Containers

Containers and containerization platforms are getting more and more popular. As computing continues to move into the cloud, opportunities are everywhere to take advantage of serverless architectures, DevOps wizardry, and seemingly infinite scalability. But if you’re not running huge workloads like training ChatGPT, can this kind of system still help with SMB-scale pipelines and routine ETL tasks? It can be tough to see how all the pieces fit together, so this tutorial will help show how just a simple Python script can be turned into a scalable, efficient, and maintainable solution for large-scale data processing (or whatever you can dream up).
The scenario we’re going to consider for this tutorial assumes you’ve got a script or application that performs some sort of data processing task- maybe it takes in a file, parses it, and uploads the result to a data lake. Now, you want to scale this task horizontally, i.e. run many many copies at the same time. You could set up a really big server that can spawn many processes, but that can get unnecessarily expensive if you have high variance in your workloads and would need to allocate sufficient infrastructure to handle peaks. Autoscaling small servers can be overkill sometimes too, with time and money lost to provisioning, and have higher costs. Instead, we can containerize the script, and use some built-in AWS services to hook it all up so that we don’t even need an explicit queueing system. Plus, it’s easy to automatically deploy updates to the core application.
Note- this tutorial assumes some basic familiarity with the AWS console and CLI.
Step 1: Containerize Your App
For this example, we’ll assume a Python script that takes a single command-line argument representing the file we want to process (using another language or runtime like Node.js should also work fine for this design; you’d just need to modify your container environment to reflect that). We’ll go through how to build a container in a moment, but first we need to talk about preparing the script for containerization. Understanding how to get data in and out of a Docker container can be a bit tricky until you’ve tried it for yourself, so I just want to explain some of that here.
In many ways, interacting with a container is similar to a VM or a remote machine- you can use commands to copy data into and out of the container, download files from the internet to the container itself, set environment variables for the container, etc. How and why you might choose a particular method is largely determined by the infrastructure you plan to use in support of the container. In this example, we’ll be using a AWS Lambda function to launch the container on the Elastic Container Service, and we need to get a file with our data in it on to the container. I decided to use the Lambda function to set an environment variable for the container that contains the S3 URI for the file, and use the AWS boto3 SDK for Python to download the file with a call to the S3 API when my script is run on the container. Since I’m using the S3 upload action to trigger the Lambda itself, this is nifty way to keep things as simple as possible. (There are certainly many other strategies to accomplish this same goal — infrastructure architecture problems often have many right answers.)
Okay, first let’s get the build working locally. You’ll need to install Docker, and make sure it’s running if you don’t already have it.
Next you’ll need the 3 magic ingredients for building the container: the script/app, a Dockerfile, and a text file called “requirements.txt” (since the container will use pip to install the required libraries). Make sure all the non-standard libraries used in the script are in the requirements.txt file (more on how to format that here).
The Dockerfile is the instructions that tell Docker how to build the container environment. Here’s an example:
# Use an official Python runtime as as the base image for the container
FROM python:3.8-slim-buster
# Add the current directory contents into the container at /app
ADD . /app
# Set the working directory in the container to /app
WORKDIR /app
# Install any needed packages specified in requirements.txt
RUN pip install — no-cache-dir -r requirements.txt
# Make port 80 available to the world outside this container
EXPOSE 80
# Run the script when the container launches
ENTRYPOINT [“python”, “my-fancy-script.py”]
The second command in the Dockerfile, “ADD . /app” moves everything in the directory we build the container in to the /app directory within the container at build time. So, we need to collect our script (which needs to be copied into the container), the requirements.txt, and the Dockerfile, and put them in a directory, and then we can build the container: navigate to the directory on your terminal, and run docker build . (make sure that the Docker service is running).
Quick note on testing: exactly what type of testing you need to do probably depends on the exact functioning of your app; testing things in Docker can be a bit tricky since you need to configure the rest of the cloud environment before you can really let it loose. In this example scenario, since we’re going to use an environment variable to pass data from a Lambda function, we could hard-code the env variable in the Dockerfile for testing by adding this line before the script is executed:ENV: variable_name=my_value
Step 2: Configure the S3 bucket
If you don’t already have a bucket you want to use, you’ll need to create an S3 bucket, and decide on what prefix (basically a subfolder for your bucket) you want to use to trigger the Lambda function. You don’t technically need a prefix, but it’s best to choose a dedicated one so that you don’t accidentally end up uploading to the same endpoint with your script and creating an infinite loop of container launching. No special permissions or policies are necessary for the bucket (but always leave public access off unless you really mean it!).
Step 3: Set up a Lambda
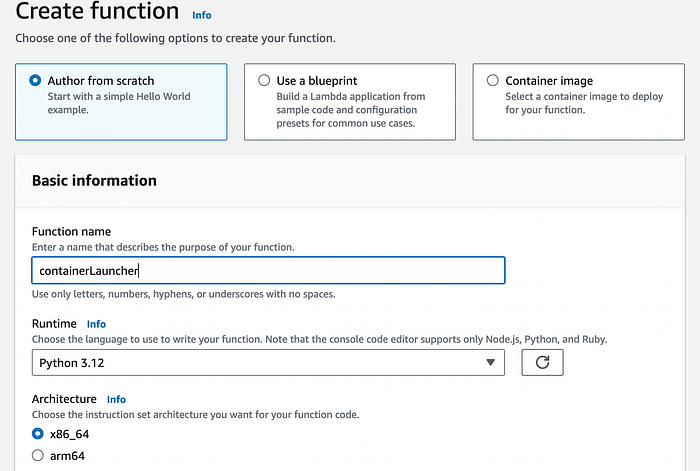
Now things start to get interesting. First, create a lambda function using whatever language/environment you want (I’m sticking with Python).
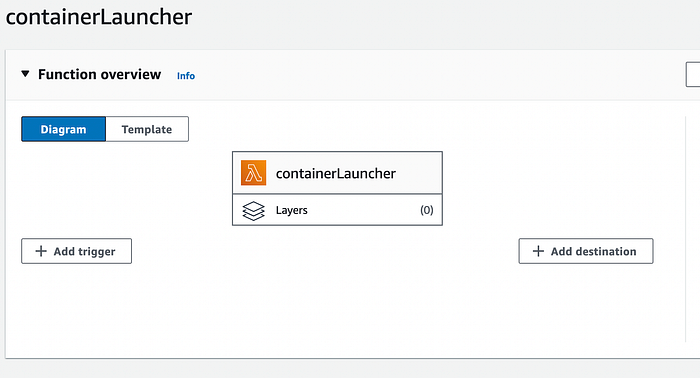
Then we’re going to choose “Add trigger” from the left side of the function overview:
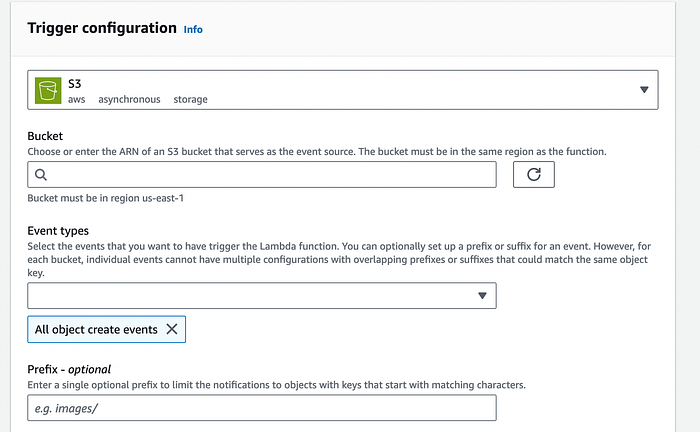
and select S3, choose your bucket, and “All object create events” in “event types”:
Now we’re ready to put some code in the lambda:
import boto3
def lambda_handler(event, context):
    #start with instantiating an ECS client so we can launch containers
    client = boto3.client(‘ecs’)

    #grabbing our filename from the S3 trigger event record
    s3_object_key = event[‘Records’][0][‘s3’][‘object’][‘key’]

    #using the ECS client to run the launch task- we'll get these parameters
    #in later steps after we create the infrastructure.
    response = client.run_task(
        cluster=’CLUSTER-NAME’, #replace with cluster name
        launchType=’FARGATE’,
        taskDefinition=’CLUSTER-ARN:task-definition/’, #replace with task definition ARN
        count=1,
        platformVersion=’LATEST’,
        #now we can use the overrides list to set the environment variable at launch
        overrides={
           ‘containerOverrides’: [
            {
               ‘name’: ‘CONTAINER-NAME’, #replace with container name
                ‘environment’: [
                     {
                       ‘name’: ‘FILE’,
                       ‘value’: s3_object_key
                     }
                 ]
            }
            ]
         },
 networkConfiguration={ ‘awsvpcConfiguration’:
                        { ‘subnets’: [‘my-subnet-id’],
                        ‘securityGroups’: [‘my-sg-id’], ‘assignPublicIp’: ‘ENABLED’
                        } #you'll need connectivity that allows internet access
                          #to download the docker image and any libraries with pip
                      }
 )
 print(response)
Now, it won’t run until we get the rest of the parameters we need, which we’ll do during Step 4:
Step 4: Deploy a Cluster and Configure the Task Definition
Head over to AWS Elastic Container Service (ECS), and create a cluster-
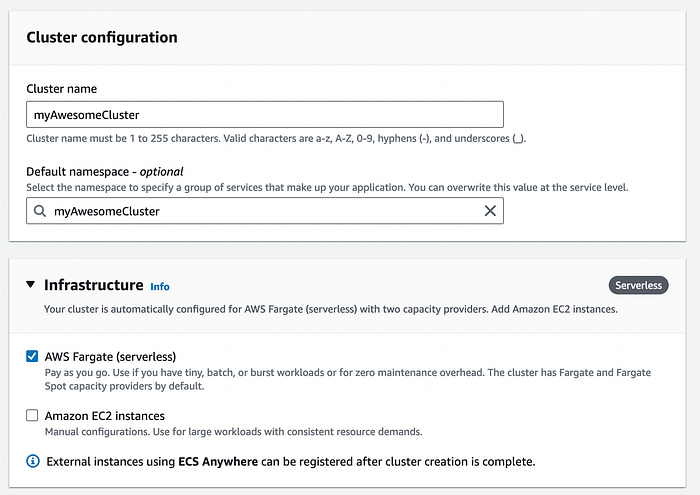
Once the cluster is created (sometimes takes a minute; if it fails, give it another try), you can put the cluster name into the Lambda code where it says ‘replace with cluster name’ in the comment.
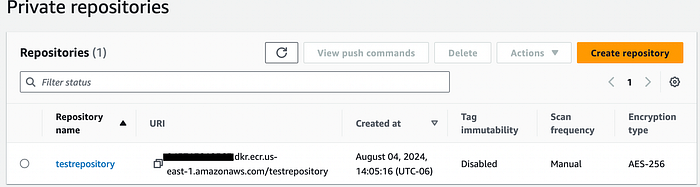
Soon we’ll need to create a task definition for the cluster, but before we can do that, we need to push the container image you built locally to the AWS Elastic Container Repository (ECR). Pop over to the ECR, and create a new private repository (or select an existing one if you already have one you want to use). Copy the URI for the repository…
…and pop back over to the terminal you used to build the Docker container earlier. Now that we’ve got a repository set up, we can push the container up to it. We’ll need to get Docker logged into to the ECR from the command line like this, using the first part of the URI from your container repo (no need to specify the subdir here)aws ecr get-login-password --region us-east-1 | docker login --username AWS --password-stdin 12345678912.dkr.ecr.us-east-1.amazonaws.com
Now we can tag and push the image to the ECR from Docker — we’ll need to snag the Image ID for the command. To do that, open up the Docker desktop and click over to the Images tab, or run docker images ls and find the local Image ID of your container — should be a 12 char hex string. Then we can tag the image (copy your image ID in where indicated):docker tag {image-id} 12345678912.dkr.ecr.us-east-1.amazonaws.com/testrepository:latest
(Check out best practices on tagging your image- they can be quite helpful and powerful in managing CI/CD workflows and builds)
And then let’s push it up!docker push 12345678912.dkr.ecr.us-east-1.amazonaws.com/testrepository:latest
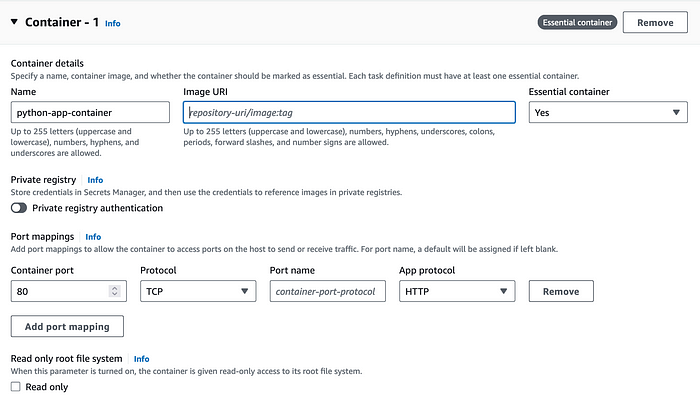
Great! Now we can set up the task definition for our cluster. Back in the AWS Console, go the ECS dashboard, and select Task Definitions from the menu on the left. Create a new task definition, and fill in the necessary parameters-
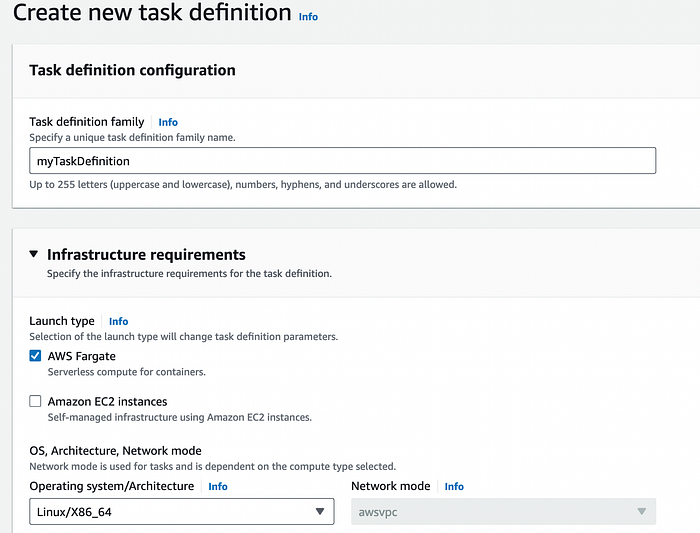
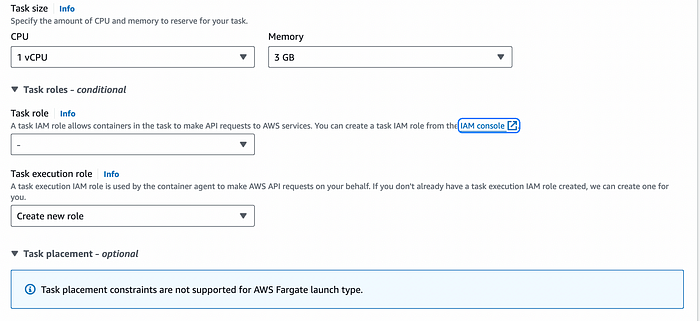
If your app is resource-intensive, make sure you allocate enough memory and vCPUs here; if you need a lot of storage, you can set that a bit farther down.
Choosing an IAM role can be tricky depending on your own AWS environment settings; if you’re not sure what you need at this point, starting with a default like AmazonECSServiceRole is probably wise. If you experience permissions errors, you may need to manually add permissions to the policy.
Then we can configure the container settings. The name you set here will need to be pasted into the Lambda function for the containerName parameter, and as you can see below, you’ll need the ECR repository name and tag that you pushed the image to earlier.
Note that CloudWatch logging is enabled by default; while not necessary to run, I definitely recommend leaving this on so you can see the output from your container when it gets launched, and see any error messages from the provisioning process or from your app, etc.
Okay! Now that we have a task definition, copy its URI and paste it in the Lambda code for the taskDefinition parameter.
Our final parameters are the subnet and security group (sg) ID. If you have a single subnet (the default), this should be pretty straightforward; if you have a more complex VPC environment, then it will be pretty specific to your configuration as far as which subnet and security groups you choose. Either way, you can find this info by going to the VPC service, and navigating first to the “Subnets” option on the VPC dashboard menu on the left, and then farther down on the same menu you will find the “Security Groups” option.

Once you fill those last parameters in, you can deploy the Lambda.
…and that’s pretty much it! If you upload a file to the S3 prefix you designated way back at the beginning, it should trigger the Lambda, which will launch your container, and pass the URI for your file in S3 to the container as an environment variable (from your app’s perspective). Of course, in reality there’s usually some IAM issues to solve, and maybe a bug or two. So how do you troubleshoot this kind of thing?
For the Lambda, use the “monitor” tab on your function’s page-

For the container, go to the ECS dashboard, select your cluster, and choose the Tasks tab-

When the Lambda successfully launches a container, you’ll see the task appear here, and you can click on the running task to see its progress- and the CloudWatch logs if you left that part enabled.
If this all works on the first try, proceed to Step 5. Otherwise, hang in there, usually it just takes a few tweaks. Feel free to post a comment if you’re getting totally stuck in case anyone else is having the issue, or maybe I can take a look myself.
If you need to make updates to the core app, you can just rebuild the container locally with your updated script, and push the image to your ECR. If you are using the ‘latest’ tag suffix, it will automatically use this new version in future launches. If you plan on integrating version control and CI/CD, consider the aforementioned tips on tagging practices.
Step 5: Grab a Coffee, Sit Back, and Watch as Your New System Handles Varying Workloads With Ease (Or Work on Your CI/CD Pipeline)
I suggest some Italian roast from Cafe Mam. But if you’re wondering what’s next for your project, I would consider looking at ways to automate deployment tasks and/or infrastructure provisioning if you use multiple environments (e.g. dev and prod, or have extensive testing infrastructure). If you use version control, you can connect services like GitHub to AWS and use their CodePipeline and/or CodeBuild services to set up workflows where you can push changes to your containerized code, and it will automatically trigger a build and deploy the new image to your task definition where it can be immediately used. Of course, with great power comes great responsibility, so make you have QA procedures set up; nobody wants to pull a CrowdStrike.
Thanks for reading!
In Plain English 🚀
Thank you for being a part of the In Plain English community! Before you go:
- Be sure to clap and follow the writer ️👏️️
- Follow us: X | LinkedIn | YouTube | Discord | Newsletter
- Visit our other platforms: CoFeed | Differ
- More content at PlainEnglish.io